Saturday, September 19, 2015

Eucalyptus Delight and the Clyde Slide


Hi!!

This is my third entry in the monthly soap challenge hosted by Amy Ward.  I have been making soap for almost a year now and love this learning journey.  There is so much to learn not only in terms of oils qualities and the diversity of additives one can use in a soap, but also how to make your soap look amazing.  I love to challenge myself with each bar of soap, to make it more nourishing and more beautiful than the last one.  That's why I didn't hesitate to purchase Amy's quarterly package of soap challenges.  For a small fee I have access to a lot of great information and techniques that drives my need to create.

This month we were challenged to use and master (oh well, mastering is maybe my need for perfection) the Clyde Slide swirl, a technique created by Clyde Yoshida of Vibrant Soaps.  I love Clyde's videos, I have spend hours watching them.  I tried this technique before and loved the results.

In total I tried three batches.  For the first one I made a salt bar using clays to color the soap.  Although the soap didn't make the cut for the challenge, I can see traces of the feathered look in it.  The second one is a complementary creamy bar of soap using the same fragrance and clays.  This one has the feather look more defined and although I could use it for the challenge I decided to try a third one.

Sadly, I forgot to take pictures of the process, but I did with the other one so for purposes of demonstration lest's imagine that this one is green and silver ok?  I bribed my hubby to take some pictures while I was pouring the layers of soap.  He took a video when I poured the soap in the mold but I am still in the need to learn how to upload it in the net. 


And here are the final takes of my soap:


I even made a mini loaf and you can see the technique is definitely in there too.  


Thanks for your visit!!  Looking forward to more amazing challenges.

Joan

Sunday, August 23, 2015

JABON JARDIN DE ROSAS


Disponible a partir de septiembre 15 de 2015.


Hola!

Desde hace un tiempo adquirí una nueva fragancia de rosas que estaba loca por probar.  Igualmente anda circulando la técnica llamada Modified Taiwan Swirl la cual me llamaba mucho la atención.  ¿Porqué entonces no combinar ambas cosas??

Para hacer esta técnica se necesita una fórmula que se mantenga suave o líquida por un tiempo bastante prolongado.  Para la misma usé una fórmula que conocemos como Bastille.  Tiene un alto contenido de aceite de oliva pero se le incorpora aceite de coco y otras mantecas para ayudar a acortar el tiempo de curación del jabón a la vez que ayudan a crear una espuma espesa y estable.  Si te gusta el jabón de castilla sin duda alguna te va a encantar el Bastille.

En la elaboración de este jabón incluímos arcilla blanca la cual es excelente para pieles secas.  Entre sus beneficios tiene un efecto tensor que ayuda a dejar la piel fresca y rejuvenecida.  Aporta minerales y otros nutrientes excelentes para la piel.  Ayuda a aliviar la inflamación, descongestiona y depura las capas de piel estimulando la regeneración del tejido.  

Así luce el jabón inmediatamente que es sacado del molde:


La magia de esta técnica se encuentra en la manera en que cortes el bloque de jabón.  Primero dividí el bloque en cuatro piezas a lo largo.


Luego cada pieza se corta a la mitad a lo ancho de la misma.  Fíjate que las barras de abajo a la mano derecha lucen diferentes a las demás.  Siguen siendo lindas, pero no se puede apreciar el verdadero efecto de la técnica.  Estas dos barras fueron cortadas a lo largo como usualmente se hace con muchas otras técnicas. 


 Aquí ya puedes observar las barras de jabón limpias y sus esquinas biseladas.  ¡Que diferencia!! 


Disponible a partir de septiembre 15 de 2015.


Wednesday, June 17, 2015

THE SMILING SOAP - EBRU SOAP TECHNIQUE


Hi!!

This month challenge is called Ebru Soap Technique. At first I was not sure if I liked this technique but decided to give it a chance. Needless to say I absolutely loved the process. I made a few “mistakes” in the way but still love the final result. 

I had sitting an Arnica infusion in olive oil waiting for a chance to make a batch of soap in combination with a blend of FO and EO from Crafter’s choice named Muscle Rescue.   I decided this was a great opportunity to try both the soap and the technique.

Here is a picture of some of the ingredients used in my soap:


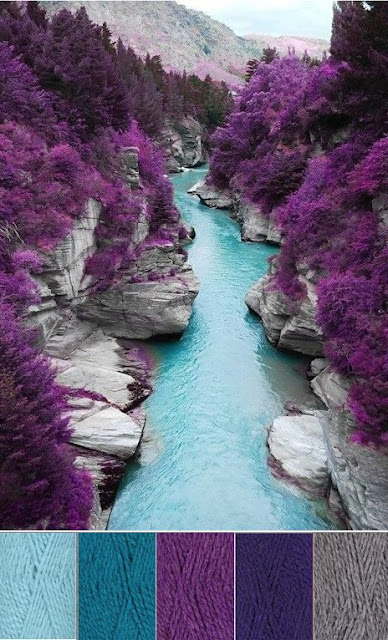
My other hobby is working with paper and making 3D projects with it. I usually start with an inspirational image and since this challenge requires the use of color I decided to do the same. I went to Pinterest which is my Holy Grail to look for inspiration and picked this picture:


The first thing I did was choose and prepare my colors. 

From Mad Oils: 

I also used Peacock but forgot to include it in the picture.


From Crafter's Choice:


For the light blue used as the base color I mixed Titanium Dioxide + Blue Oil (CF) + The Maniacal Pea (MO).

For the Navy Blue I mixed Cobalt Blue Ultramarine + Black Oxide both from CF.


I used the same slow moving recipe I got from the spinning swirl tutorial.

I added the fragrance and the lye water to the oils at the same time to make sure to stop the blender at the emulsified stage to divide and color the soap.  Since I had never used that blend of FO and EO I was not sure how will they react in the process.  It did wonderfully.


Once everything was ready I poured the base of the soap and started to mix in the colors. The BIG mistake I made was to use all the turquoise batter at once. Ohh boy!! I realized my stupidity too late LOL! It's a good thing that there is always some residual soap in the bowl and I was able to use a drop of it at the end to add that pop of color.


Here is how it looks after pouring all the soap and before starting to make the design.


Here I started to make the flowers:


All the flowers:


And the final result. At this point all that was left was to wait for the process to take place and see how my soap turned out. So I waited....


And here are the pictures of my smiling soap. I named it like that because the design looks like smiling faces to me. Ok... Scary smiling faces LOL!


And more pictures of the loaf divided into bars. I still don't own a slab mold so I did with what I have. Still, I like how they turned out and I will keep practicing with this new technique.


I even had enough batter to make a mini loaf. My mom will be a happy camper!!


For a next time if I still don't have a slab mold I will try and make some kind of swirl inside the soap.  Still, I love my smiling soap and it smells wonderful.

Thanks a lot  for your visit and have a great day!! 
Joan